 项目经验分享:开发 JuatAuth Plus 的 springboot starter 依赖包
# 项目经验分享:开发JuatAuth Plus的Springboot starter 依赖包
本项目在JustAuth Plus (opens new window)授权框架(简称jap)的基础上,开发其spring boot starter,包括以下六个模块:
- 开发jap提供的四种授权策略的对应的spring boot starter模块:
jap-simple-spring-boot-starter、jap-oauth2-spring-boot-starter、jap-social-spring-boot-starter、jap-oidc-spring-boot-starter,并将它们插件化,实现按需引入。也就是说,你的web应用若需要相应模块,才添加对应的maven坐标; jap-spring-boot-starter。提供一个对四种授权策略高度封装的类:JapTemplate;- 为上述模块抽取出的基础模块
jap-common,包括上述模块都会用到的一些自动配置类和和工具类等;
除了以上模块之外,为了支持redis作为缓存数据源,也将spring-boot-starter-redis以插件化的形式引入。
本次分享主要涉及以下几点:
Spring Boot的自动装配过程,并与@Configurarion相区别,以及@Conditional系列注解的使用;
将四种授权策略抽取为单独的starter模块,并为了实现四种授权策略的插件化,需要掌握的maven中<optional>和<scope>标签;
充分利用Spring的web支持,采用RequestContextHolder获取当前线程请求上下文,进一步封装JustAuth Plus框架的授权过程;
打包并发布jar包到maven仓库,涉及maven的lifecycle和plugin。
# 自动装配与@ConditionalOnBean
若不熟悉Spring Boot的自动装配使用和原理,可以阅读这篇文章:Spring Boot面试杀手锏————自动配置原理 (opens new window),这里主要分享自动装配与@Configuration的差别。
# @ConditionalOnBean为什么失效?
以jap-social-spring-boot-starter模块为例,其中的SocialAutoConfiguration作为自动配置(auto-configuration)类会创建SocialStrategy的bean。在jap-spring-boot-starter模块中SocialOperations的bean需要只在SocialStrategy 的bean存在的情况下创建。
SocialAutoConfiguration:
@Configuration
public class SocialAutoConfiguration {
    @Bean
    @ConditionalOnMissingBean
    public SocialStrategy socialStrategy(ApplicationContext applicationContext,
                                         JapBasicProperties basicProperties,
                                         SocialProperties socialProperties,
                                         AuthStateCache authStateCache,
                                         JapCache japCache){
        //......略
    }
}
2
3
4
5
6
7
8
9
10
11
12
OperationAutoConfiguration$Social:
@Configuration
@ConditionalOnBean({SocialStrategy.class})//在SocialStrategy的bean存在的情况下才创建SocialOperations bean
static class Social{
    @Bean
    @ConditionalOnMissingBean
    public SocialOperations socialOperations(SocialStrategy socialStrategy,
                                             SocialProperties socialProperties){
        //......略
    }
}
2
3
4
5
6
7
8
9
10
在debug后发现,其实存在SocialStrategy的bean,但SocialOperations的实例并不会因此创建,看起来@ConditionalOnBean失效了?通过debug发现,OperationAutoConfiguration$Social居然在SocialAutoConfiguration之前被加载^1:

原来不是@ConditionalOnBean失效了,而是配置类的加载顺序有问题。所以,现在需要解决的问题是,如何控制配置类的加载顺序?
想到了@AutoConfigureAfter,但debug后结果还是一样,似乎这个注解也是无效的,似乎@COnfiguration注解的配置类并不能控制加载顺序?
在StackOverflow上找到了解决方案:Spring annotation conditionalOnBean not working (opens new window),回答非常精彩:
The javadoc for
@ConditionalOnBeandescribes it as:
Conditionalthat only matches when the specified bean classes and/or names are already contained in theBeanFactory.In this case, the key part is "already contained in the
BeanFactory". Your own configuration classes are considered before any auto-configuration classes. This means that the auto-configuration of theMetricsEndpointbean hasn't happened by the time that your own configuration is checking for its existence and, as a result, yourMetricsFormatEndpointbean isn't created.One approach to take would be to create your own auto-configuration class (opens new window) for your
MetricsFormatEndpointbean and annotate it with@AutoConfigureAfter(EndpointAutoConfiguration.class). That will ensure that its conditions are evaluated after theMetricsEndpointbean has been defined.
加粗的两点很关键。在此之前我一直认为有@Configuration注解的配置类和写入META-INF/spring.factories中的配置类都一样,以为是Spring Boot提供的实现自动配置的两种殊途同归的方式而已。然而@Configuration早在Spring时期就有,应被称作Externalized Configuration (opens new window),也即上边引用中加粗的***Your own configuration classes***。而META-INF/spring.factories是Spring Boot提供的,这才是auto-configuration本身。
访问上面的链接create your own auto-configuration class (opens new window),在7.10.2节里有个note:
Auto-configurations must be loaded that way only. Make sure that they are defined in a specific package space and that they are never the target of component scanning. Furthermore, auto-configuration classes should not enable component scanning to find additional components. Specific
@Imports should be used instead.自动配置类只能被 那种 方式加载。(后面的略)
第一句话非常关键,“那种”方式指的就是在META-INF/spring.factories文件中指定配置类,而不是采用@Configuration注解。
了解了两者的区别后,我将所有自动配置类的@Configuration注解去掉,让它们只通过auto-configuration的方式被加载,再使用上@AutoConfigureAfter注解,debug后发现配置类的加载顺序得到了控制,所有策略的自动配置类XxxAutoConfiguration都优先于OperationAutoConfiguration$Xxx:

# pom.xml中<optional>和<scope>元素
以本项目开发的jap-common和jap-spring-boot-starter模块的pom.xml文件中引入的部分maven依赖为例,主要区别<scope>provided</scope>和<optional>true</optional>。
首先假设有一个名叫***demo***的maven项目引入了jap-spring-boot-starter依赖:
<dependency>
    <groupId>com.fujieid.jap.spring.boot</groupId>
    <artifactId>jap-spring-boot-starter</artifactId>
    <version>0.0.1-SNAPSHOT</version>
</dependency>
2
3
4
5
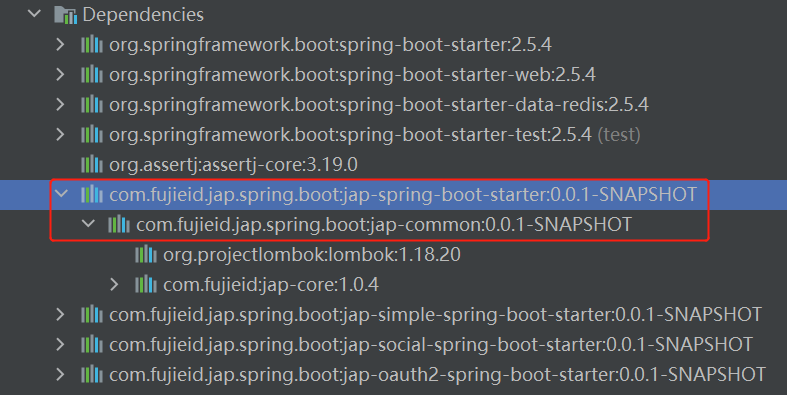
而jap-spring-boot-starter中有jap-common依赖,因此通过依赖传递,demo项目中也间接引入了jap-common模块:

在jap-common的pom.xml中,有:
<dependency>
    <groupId>org.springframework.boot</groupId>
    <artifactId>spring-boot-starter</artifactId>
    <version>2.5.4</version>
    <scope>provided</scope>
</dependency>
<dependency>
    <groupId>org.springframework.boot</groupId>
    <artifactId>spring-boot-starter-web</artifactId>
    <version>2.5.4</version>
    <scope>provided</scope>
</dependency>
2
3
4
5
6
7
8
9
10
11
12
这两个依赖配置中都有<scope>provided</scope>元素,这样做想达到的目的是,在demo项目 中引入了jap-common模块的maven坐标,那它作为jap-common的子项目,也一定是一个Spring Boot项目,则一定会使用spring-boot-starter和spring-boot-starter-web。因此,这两个依赖没有必要参与依赖传递,应该由demo项目自己提供这两个依赖。这样做的考量大概有两点,一是为了避免jar包冲突,避免一些冗余的重复依赖;二是为了让发布的jar包或者war包”瘦身“,此时的jap-common打包时是不会包含spring-boot-starter和spring-boot-starter-web的。
接下来考察<optional>true</optional>元素,在jap-spring-boot-starter中:
<dependency>
    <groupId>com.fujieid.jap.spring.boot</groupId>
    <artifactId>jap-simple-spring-boot-starter</artifactId>
    <version>0.0.1-SNAPSHOT</version>
    <optional>true</optional>
</dependency>
<dependency>
    <groupId>com.fujieid.jap.spring.boot</groupId>
    <artifactId>jap-social-spring-boot-starter</artifactId>
    <version>0.0.1-SNAPSHOT</version>
    <optional>true</optional>
</dependency>
<dependency>
    <groupId>com.fujieid.jap.spring.boot</groupId>
    <artifactId>jap-oauth2-spring-boot-starter</artifactId>
    <version>0.0.1-SNAPSHOT</version>
    <optional>true</optional>
</dependency>
<dependency>
    <groupId>com.fujieid.jap.spring.boot</groupId>
    <artifactId>jap-oidc-spring-boot-starter</artifactId>
    <version>0.0.1-SNAPSHOT</version>
    <optional>true</optional>
</dependency>
2
3
4
5
6
7
8
9
10
11
12
13
14
15
16
17
18
19
20
21
22
23
24
可以发现四种策略的starter模块都有<optional>true</optional>元素,与<scope>provided</scope>相似的地方是,有<optional>true</optional>元素的模块仍然不具有依赖传递,且打包时也不会包含该模块。更重要的是区别,有<scope>provided</scope>元素的maven依赖,如jap-common中的spring-boot-starter,表明虽然jap-common模块不传递该依赖,但是demo项目 作为jap-common的使用方,你必须自行提供。然而有<optional>true</optional>元素的依赖就没有那么强制的要求了,它的意思是“可选的”。可以把jap-simple-spring-boot-starter理解为插件,如果demo项目 中用不上授权策略simple,那完全可以不在demo项目 中引入该依赖。
扩展阅读:Maven中Optional和Scope元素的使用场景,你弄明白了? (opens new window)、Maven 中true和provided之间的区别 (opens new window)
# 利用RequestContextHolder
在jap框架中,所有的授权方法authenticate(...)都需要传入HttpServletRequest和HttpServletResponse参数,如jap-social进行授权:
JapResponse japResponse = socialStrategy.authenticate(config, request, response);
其实在Spring框架下可以利用RequestContextHolder类:
Holder class to expose the web request in the form of a thread-bound RequestAttributes object. The request will be inherited by any child threads spawned by the current thread if the inheritable flag is set to true.
该类(
RequestContextHolder)是一个持有web请求的类,web请求是RequestContextHolder以绑定在线程上的RequestAttributes的形式暴露。……
RequestContextHolder中有这样一个私有属性:
private static final ThreadLocal<RequestAttributes> requestAttributesHolder =
			new NamedThreadLocal<>("Request attributes");
2
是ThreadLocal类型的,也就是说,不同的线程RequestAttributes是不同的。同时,一个web后台应用的线程通常都是通过web请求触发而创建,因此,其实可以通过这种方式获取request,对jap框架作进一步封装。
HttpServletRequest request = requestAttributes.getRequest();
HttpServletResponse response = requestAttributes.getResponse();
2
扩展阅读:SpringMVC之RequestContextHolder分析 (opens new window)
# Oauth2授权策略
Oauth2是一个很重要的授权策略,我在阅读OAuth 2.0 的四种方式 (opens new window)这篇文章后画了一个授权UML序列图,方便理解。
以授权码方式为例,需要特别注意的地方是,应用服务器实际上只需要提供一个访问接口,也就是redirect_uri参数对应的地址,访问这个地址必须携带code参数。这种授权方式特特别考验对重定向的理解,请注意gitee的oauth服务并不会访问redirect_uri地址,而是让给户浏览器重定向(注意区别转发)到redirect_uri对应的地址(同时携带code参数),让用户浏览器去访问redirect_uri地址。这也是为什么在测试过程中通常redirect_uri可以是localhost,毕竟gitee oauth服务能不能访问到localhost不重要,只要用户浏览器能够访问localhost即可。
# maven的lifecycle和plugin
主要参考maven官方文档:http://maven.apache.org/ref/3.5.0/maven-core/lifecycles.html
# default lifecycle
maven定义了三类lifecycle (opens new window):
- default Lifecycle
- clean Lifecycle
- site Lifecycle
不论是哪类lifecycle,其中都包含多个阶段(phase),而阶段只是一个抽象的概念,它本身不会有具体的执行。某个phase的具体执行是交由绑定到该phase的插件(plugin)来完成。一个plugin会有多个goal,这些goal会最终完成具体的执行。比如compiler插件,就有三个goal可供选择:

需要重点理解的是default lifecycle的定义:
defaultlifecycle is defined without any associated plugin. Plugin bindings for this lifecycle are defined separately for every packaging (opens new window):<!-- default lifecycle的定义。只定义了一些列phase,没有为这些phase绑定任何plugin。有点长,截取了一部分 --> <phases> <phase>validate</phase> <phase>initialize</phase> ...... <phase>deploy</phase> </phases>1
2
3
4
5
6
7
我的理解是,default lifecycle定义的时候没有为其中的phase默认关联一些plugin,理由是,根据packaging的不同,有些phase绑定了一个或多个plugin和相应goal的,而有些phase却没有绑定任何的plugin,这就意味着这个packaging方式在该阶段(phase)不作任何操作。
举个栗子,下边分别是pom packaging和jar packaging (opens new window)。可以很明显的发现,相比于jar packaging,pom packaging只有install和deploy这两个phase绑定(bind)了plugin和相应goal的。但不论是jar还是pom,它们都采用的是default lifecycle,所以虽然pom packaging在complie这个phase没有绑定plugin,但是它还是会经历complie阶段(phase),只是什么都不做而已。
<!-- pom packaging -->
<phases>
  <install>
    org.apache.maven.plugins:maven-install-plugin:2.4:install
  </install>
  <deploy>
    org.apache.maven.plugins:maven-deploy-plugin:2.7:deploy
  </deploy>
</phases>
2
3
4
5
6
7
8
9
<!-- jar packaging -->
<phases>
  <process-resources>
    org.apache.maven.plugins:maven-resources-plugin:2.6:resources
  </process-resources>
  <compile>
    org.apache.maven.plugins:maven-compiler-plugin:3.1:compile
  </compile>
  <process-test-resources>
    org.apache.maven.plugins:maven-resources-plugin:2.6:testResources
  </process-test-resources>
  <test-compile>
    org.apache.maven.plugins:maven-compiler-plugin:3.1:testCompile
  </test-compile>
  <test>
    org.apache.maven.plugins:maven-surefire-plugin:2.12.4:test
  </test>
  <package>
    org.apache.maven.plugins:maven-jar-plugin:2.4:jar
  </package>
  <install>
    org.apache.maven.plugins:maven-install-plugin:2.4:install
  </install>
  <deploy>
    org.apache.maven.plugins:maven-deploy-plugin:2.7:deploy
  </deploy>
</phases>
2
3
4
5
6
7
8
9
10
11
12
13
14
15
16
17
18
19
20
21
22
23
24
25
26
27
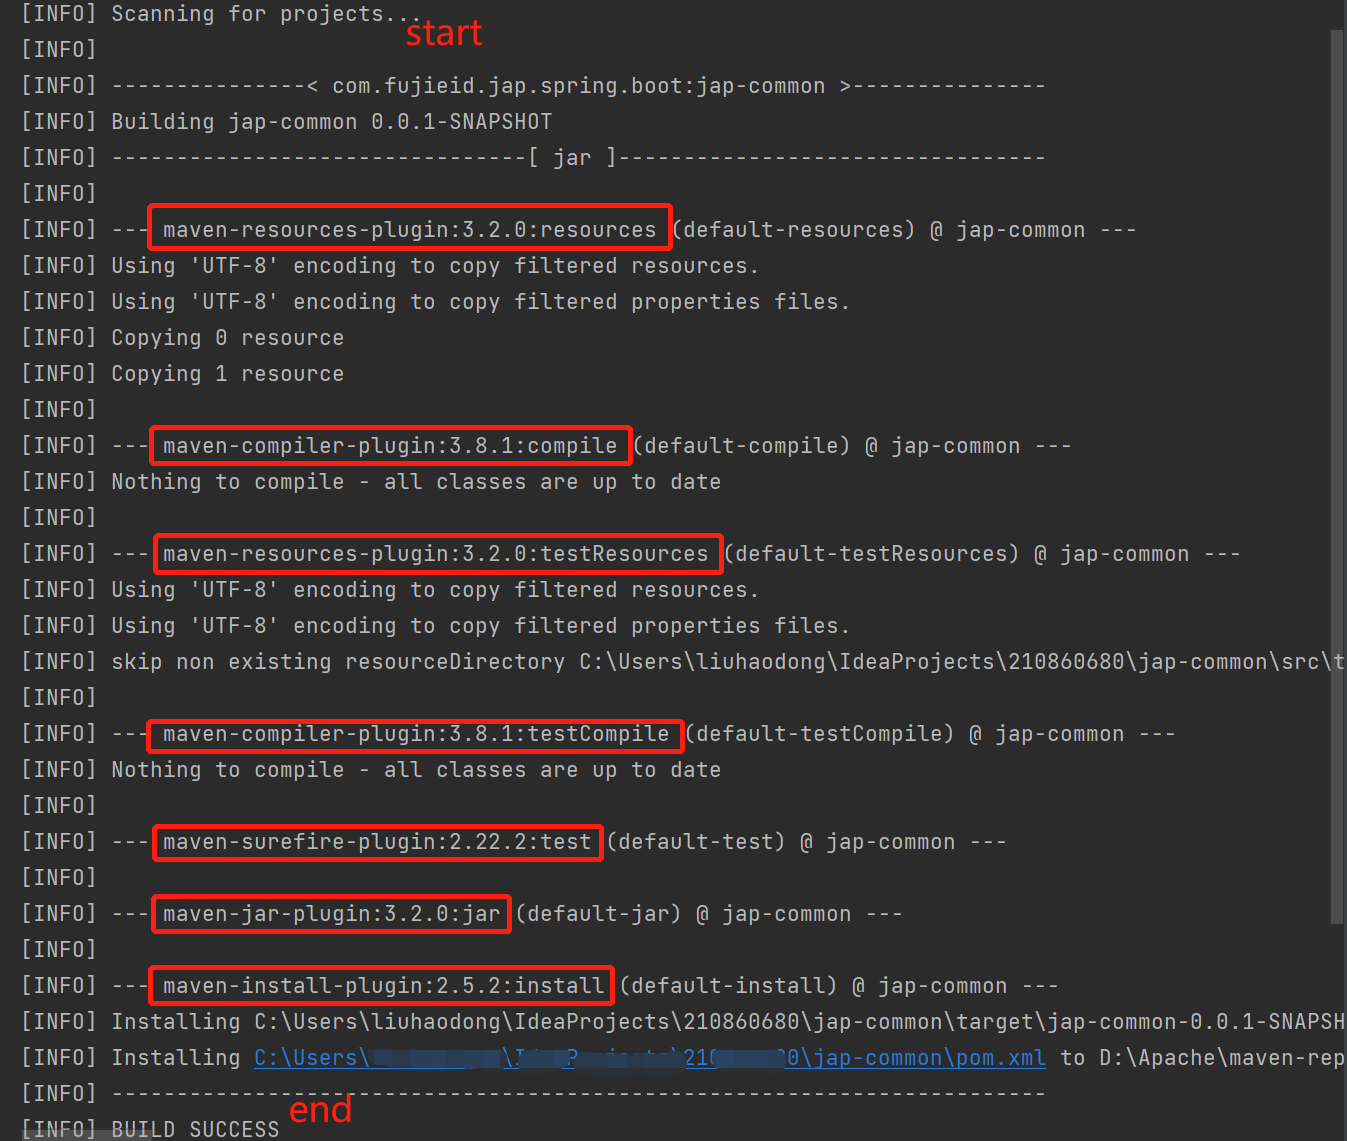
下面进行一个测试,对我的项目执行install阶段。jar 是 maven 默认的 packaging 类型,packaging 未显式指定时为 jar 类型。下面执行的phase和顺序刚好和上面的jar packaing相吻合。
最后看看clean lifecycle的定义,可以发现不像default phase一样,只有光秃秃的定义了一堆phase,这里在定义了一些phase的同时还为一些phase绑定了默认的plugin,比如这里,对clean phase绑定了maven-clean-plugin以及其中的clean目标。
cleanlifecycle is defined directly with its plugin bindings.clean lifecycle直接和它相绑定的plugin一起定义。
<phases>
<phase>pre-clean</phase>
<phase>clean</phase>
<phase>post-clean</phase>
</phases>
<default-phases>
<clean>
 org.apache.maven.plugins:maven-clean-plugin:2.5:clean
</clean>
</default-phases>
1
2
3
4
5
6
7
8
9
10
# Available Plugins
在maven官方文档Available Plugins (opens new window)中第一句话很关键:
Maven is - at its heart - a plugin execution framework; all work is done by plugins. Looking for a specific goal to execute? This page lists the core plugins and others. There are the build and the reporting plugins:
maven,本质上是一个基于插件执行的框架;所有的工作都由plugin来完成。在寻找并执行一个具体的goal(目标)吗?本文列出了一些核心的plugin和别的plugin,它们被分为build plugin和report plugin。
扩展阅读:Maven 的 Lifecycle 和 plugins (opens new window)
