 jap-ids 快速开始
提示
本文将讲解如何快速的使用 jap-ids 搭建 OAuth2.0(含OIDC)服务器
# 第一步:引入依赖
<dependency>
    <groupId>com.fujieid</groupId>
    <artifactId>jap-ids</artifactId>
    <version>{latest-version}</version>
</dependency>
1
2
3
4
5
2
3
4
5
可选版本:
- 稳定版(发版较快照版慢):
- 快照版(实时更新最新功能,但不保证稳定):
# 第二步:实现 ids 接口
- 实现
IdsClientDetailService.java
package com.fujieid.ids.demo.service;

import com.fujieid.jap.ids.model.ClientDetail;
import com.fujieid.jap.ids.model.enums.GrantType;
import com.fujieid.jap.ids.model.enums.ResponseType;
import com.fujieid.jap.ids.provider.IdsScopeProvider;
import com.fujieid.jap.ids.service.IdsClientDetailService;
import com.fujieid.jap.ids.util.OauthUtil;
import org.springframework.stereotype.Service;

import java.util.Arrays;
import java.util.LinkedList;
import java.util.List;

/**
 * @author yadong.zhang (yadong.zhang0415(a)gmail.com)
 * @version 1.0.0
 * @date 2021-04-14 10:27
 * @since 1.0.0
 */
@Service
public class IdsClientDetailServiceImpl implements IdsClientDetailService {

    /**
     * 通过 client_id 查询客户端信息
     *
     * @param clientId 客户端应用id
     * @return AppOauthClientDetails
     */
    @Override
    public ClientDetail getByClientId(String clientId) {
        return null;
    }

    /**
     * Add client
     *
     * @param clientDetail Client application details
     * @return ClientDetail
     */
    @Override
    public ClientDetail add(ClientDetail clientDetail) {
        return null;
    }

    /**
     * Modify the client
     *
     * @param clientDetail Client application details
     * @return ClientDetail
     */
    @Override
    public ClientDetail update(ClientDetail clientDetail) {
        return null;
    }

    /**
     * Delete client by primary key
     *
     * @param id Primary key of the client application
     * @return boolean
     */
    @Override
    public boolean removeById(String id) {
        return false;
    }

    /**
     * Delete client by client id
     *
     * @param clientId Client application id
     * @return ClientDetail
     */
    @Override
    public boolean removeByClientId(String clientId) {
        return false;
    }

    /**
     * 获取所有 client detail
     *
     * @return List
     */
    @Override
    public List<ClientDetail> getAllClientDetail() {
        return null;
    }
}
1
2
3
4
5
6
7
8
9
10
11
12
13
14
15
16
17
18
19
20
21
22
23
24
25
26
27
28
29
30
31
32
33
34
35
36
37
38
39
40
41
42
43
44
45
46
47
48
49
50
51
52
53
54
55
56
57
58
59
60
61
62
63
64
65
66
67
68
69
70
71
72
73
74
75
76
77
78
79
80
81
82
83
84
85
86
87
88
2
3
4
5
6
7
8
9
10
11
12
13
14
15
16
17
18
19
20
21
22
23
24
25
26
27
28
29
30
31
32
33
34
35
36
37
38
39
40
41
42
43
44
45
46
47
48
49
50
51
52
53
54
55
56
57
58
59
60
61
62
63
64
65
66
67
68
69
70
71
72
73
74
75
76
77
78
79
80
81
82
83
84
85
86
87
88
- 实现
IdsUserService.java
package com.fujieid.ids.demo.service;

import com.fujieid.jap.ids.model.UserInfo;
import com.fujieid.jap.ids.service.IdsUserService;
import org.springframework.stereotype.Service;

/**
 * @author yadong.zhang (yadong.zhang0415(a)gmail.com)
 * @version 1.0.0
 * @date 2021-04-14 10:27
 * @since 1.0.0
 */
@Service
public class IdsUserServiceImpl implements IdsUserService {

    /**
     * Login with account and password
     *
     * @param username account number
     * @param password password
     * @return UserInfo
     */
    @Override
    public UserInfo loginByUsernameAndPassword(String username, String password, String clientId) {
        return null;
    }

    /**
     * Get user info by userid.
     *
     * @param userId userId of the business system
     * @return UserInfo
     */
    @Override
    public UserInfo getById(String userId) {
        return null;
    }

    /**
     * Get user info by username.
     *
     * @param username username of the business system
     * @return UserInfo
     */
    @Override
    public UserInfo getByName(String username, String clientId) {
        return null;
    }
}
1
2
3
4
5
6
7
8
9
10
11
12
13
14
15
16
17
18
19
20
21
22
23
24
25
26
27
28
29
30
31
32
33
34
35
36
37
38
39
40
41
42
43
44
45
46
47
48
49
50
2
3
4
5
6
7
8
9
10
11
12
13
14
15
16
17
18
19
20
21
22
23
24
25
26
27
28
29
30
31
32
33
34
35
36
37
38
39
40
41
42
43
44
45
46
47
48
49
50
# 第三步:注册 ids 上下文
通过 JapIds.registerContext 方法注册 ids 上下文,配置全局参数。
// 注册 JAP IDS 上下文
JapIds.registerContext(new IdsContext()
    .setUserService(idsUserService)
    .setClientDetailService(idsClientDetailService)
    .setIdentityService(idsIdentityService)
    .setIdsConfig(new IdsConfig()
        .setIssuer("http://localhost:" + port)
        .setJwtConfig(new JwtConfig()
            .setJwksKeyId("jap-jwk-keyid")
            .setJwksJson("{\n" +
                "    \"keys\": [\n" +
                "        {\n" +
                "            \"p\": \"v5G0QPkr9zi1znff2g7p5K1ac1F2KNjXmk31Etl0UrRBwHiTxM_MkkldGlxnXWoFL4_cPZZMt_W14Td5qApknLFOh9iRWRPwqlFgC-eQzUjPeYvxjRbtV5QUHtbzrDCLjLiSNyhsLXHyi_yOawD2BS4U6sBWMSJlL2lShU7EAaU\",\n" +
                "            \"kty\": \"RSA\",\n" +
                "            \"q\": \"s2X9UeuEWky_io9hFAoHZjBxMBheNAGrHXtWat6zlg2tf_SIKpZ7Xs8C_-kr9Pvj-D428QsOjFZE-EtNBSXoMrvlMk7fGDl9x1dHvLS9GSitkXH2-Wthg8j0j0nfAmyEt94jP-XEkYic1Ok7EfBOPuvL21HO7YuB-cOff9ZGvBk\",\n" +
                "            \"d\": \"Rj-QBeBdx85VIHkwVY1T94ZeeC_Z6Zw-cz5lk5Msw0U9QhSTWo28-d2lYjK7dhQn-E19JhTbCVE11UuUqENKZmO__yRgO1UJaj2x6vWMtgJptah7m8lI-QW0w6TnVxAHWfRPpKSEfbN4SpeufYf5PYhmmzT0A954Z2o0kqS4iHd0gwNAovOXaxriGXO1CcOQjBFEcm0BdboQZ7CKCoJ1D6S0xZpVFSJg-1AtagY5dzStyekzETO2tQSmVw4ogIoJsIbu3aYwbukmCoULQfJ36D0mPzrTG5oocEbbuCps_vH72VjZORHHAl4hwritFT_jD2bdQHSNMGukga8C0L1WQQ\",\n" +
                "            \"e\": \"AQAB\",\n" +
                "            \"use\": \"sig\",\n" +
                "            \"kid\": \"jap-jwk-keyid\",\n" +
                "            \"qi\": \"Asr5dZMDvwgquE6uFnDaBC76PY5JUzxQ5wY5oc4nhIm8UxQWwYZTWq-HOWkMB5c99fG1QxLWQKGtsguXfOXoNgnI--yHzLZcXf1XAd0siguaF1cgQIqwRUf4byofE6uJ-2ZON_ezn6Uvly8fDIlgwmKAiiwWvHI4iLqvqOReBgs\",\n" +
                "            \"dp\": \"oIUzuFnR6FcBqJ8z2KE0haRorUZuLy38A1UdbQz_dqmKiv--OmUw8sc8l3EkP9ctvzvZfVWqtV7TZ4M3koIa6l18A0KKEE0wFVcYlwETiaBgEWYdIm86s27mKS1Og1MuK90gz800UCQx6_DVWX41qAOEDWzbDFLY3JBxUDi-7u0\",\n" +
                "            \"alg\": \"RS256\",\n" +
                "            \"dq\": \"MpNSM0IecgapCTsatzeMlnaZsmFsTWUbBJi86CwYnPkGLMiXisoZxcS-p77osYxB3L5NZu8jDtVTZFx2PjlNmN_34ZLyujWbDBPDGaQqm2koZZSnd_GZ8Dk7GRpOULSfRebOMTlpjU3iSPPnv0rsBDkdo5sQp09pOSy5TqTuFCE\",\n" +
                "            \"n\": \"hj8zFdhYFi-47PO4B4HTRuOLPR_rpZJi66g4JoY4gyhb5v3Q57etSU9BnW9QQNoUMDvhCFSwkz0hgY5HqVj0zOG5s9x2a594UDIinKsm434b-pT6bueYdvM_mIUEKka5pqhy90wTTka42GvM-rBATHPTarq0kPTR1iBtYao8zX-RWmCbdumEWOkMFUGbBkUcOSJWzoLzN161WdYr2kJU5PFraUP3hG9fPpMEtvqd6IwEL-MOVx3nqc7zk3D91E6eU7EaOy8nz8echQLl6Ps34BSwEpgOhaHDD6IJzetW-KorYeC0r0okXhrl0sUVE2c71vKPVVtueJSIH6OwA3dVHQ\"\n" +
                "        }\n" +
                "    ]\n" +
                "}")
            )
        )
    );
1
2
3
4
5
6
7
8
9
10
11
12
13
14
15
16
17
18
19
20
21
22
23
24
25
26
27
28
29
30
2
3
4
5
6
7
8
9
10
11
12
13
14
15
16
17
18
19
20
21
22
23
24
25
26
27
28
29
30
这儿有几点要注意:
JwksKeyId和JwksJson(证书)中的kid属性要一致;JwksKeyId默认为jap-jwk-keyid;- 如果
JwksJson(证书) 中的kid不等于jap-jwk-keyid,则必须要通过setJwksKeyId指定正确的kid; JapIds.registerContext方法,必须要在 http 接口请求发起前执行。推荐处理方式:监听项目启动事件,项目启动成功后立即执行该方法。
生成 JWK 证书的方式
- 从 https://mkjwk.org/ (opens new window) 平台生成。生成证书时,请注意选择加密算法,
jap-ids默认使用RS256算法。; - 使用
jap-ids中提供的com.fujieid.jap.ids.util.JwkUtil工具类生成证书。注意:使用JwkUtil.createRsaJsonWebKeySetJson或者JwkUtil.createEsJsonWebKeySetJson这两个方法生成证书才能用于jap-idstoken 的加解密。其他方法是为了方便开发者在其他业务下便捷生成证书而提供的。
关于支持的加解密算法
jap-ids 中 token 的加解密仅支持以下算法:RS256、RS384、RS512、ES256、ES384、ES512
关于自定义 Token 加解密密钥的说明,请参考:
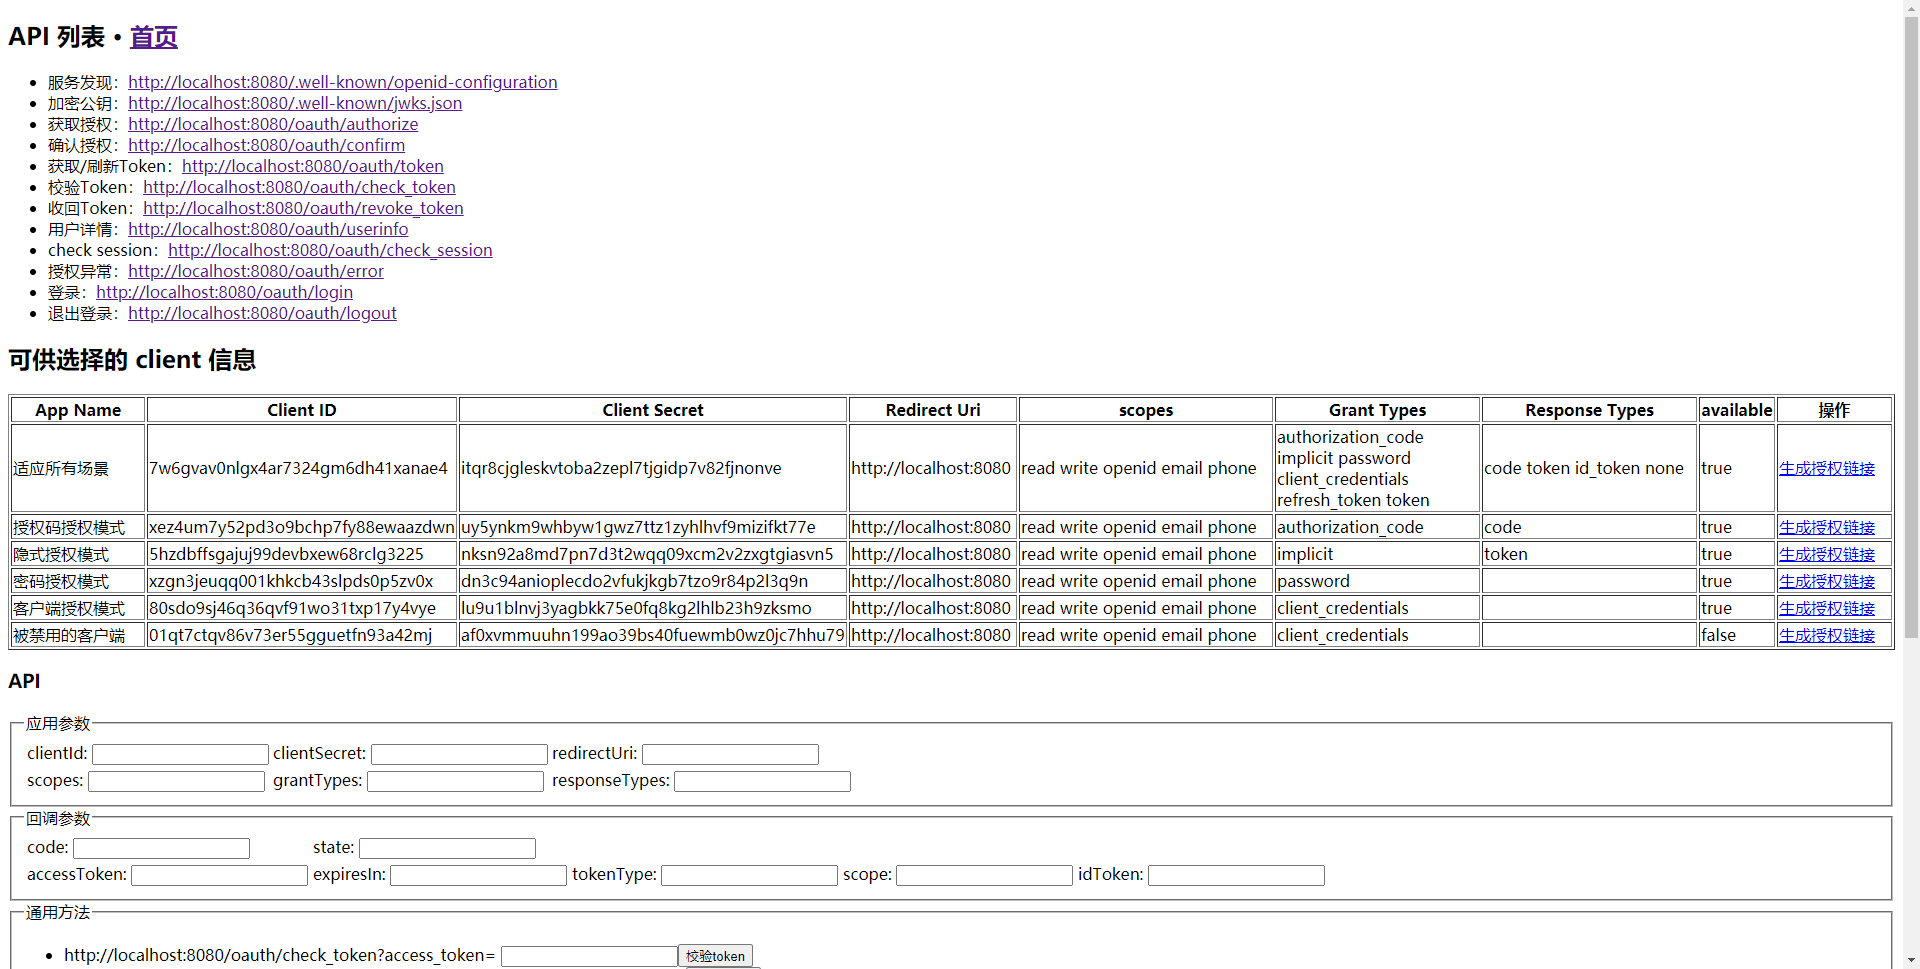
# 第四步:开发相关 http 接口
OAuth 服务需要以下几个接口:
- GET服务发现:http://{host}:{port}/.well-known/openid-configuration
- GET解密公钥:http://{host}:{port}/.well-known/jwks.json
- GET获取授权:http://{host}:{port}/oauth/authorize 跳转页面(登录页面或者回调页面)
- POST同意授权:http://{host}:{port}/oauth/authorize 同意授权(在确认授权之后)
- GET自动授权:http://{host}:{port}/oauth/authorize/auto 自动授权(不会显示确认授权页面)
- GET确认授权:http://{host}:{port}/oauth/confirm 登录完成后的确认授权页面
- GET/POST获取/刷新Token:http://{host}:{port}/oauth/token
- GET/POST收回Token:http://{host}:{port}/oauth/revoke_token
- GET/POST用户详情:http://{host}:{port}/oauth/userinfo
- GETcheck session:http://{host}:{port}/oauth/check_session
- GET授权异常:http://{host}:{port}/oauth/error
- GET登录:http://{host}:{port}/oauth/login 跳转到登录页面
- POST登录:http://{host}:{port}/oauth/login 执行登录表单
- GET退出登录:http://{host}:{port}/oauth/logout
注意,如果你在开发 http 接口时, 没有按照以上示例的路径格式命名,那么,在你开发完成后,需要在第三步:注册 ids 上下文时,重新配置IdsConfig节点下相关属性,如下:
| 属性名 | 对应 http 接口 | 默认值 | 备注 |
|---|---|---|---|
loginUrl | 登录页面/登录的 API 接口 | /oauth/login | 当未配置 loginPageUrl 时,loginUrl 即表示登录页面又表示登录的 API 接口,所以开发接口时需要保持一致。 API 接口使用 POST 方式,登录页面使用 GET 方式 |
errorUrl | 授权异常 | /oauth/error | |
authorizeUrl | 获取授权 | /oauth/authorize | |
authorizeAutoApproveUrl | 自动授权(不显示确认授权页面) | /oauth/authorize/auto | |
tokenUrl | 获取/刷新Token | /oauth/token | |
userinfoUrl | 用户详情 | /oauth/userinfo | |
registrationUrl | 注册 | /oauth/registration | (未提供) |
endSessionUrl | 退出登录 | /oauth/logout | |
checkSessionUrl | 校验登录状态 | /oauth/check_session | |
jwksUrl | 解密数据的公钥 | /.well-known/jwks.json | |
discoveryUrl | OIDC 服务发现 | /.well-known/openid-configuration | |
loginPageUrl | 登录页面 | /oauth/login | 内置有登录表单 |
externalLoginPageUrl | 是否为外部登录页面 | false | 当 loginPageUrl 托管到第三方服务中时(loginPageUrl 所在域名和授权服务所在域名不一致),必须开启该配置 |
confirmPageUrl | 确认授权页面 | /oauth/confirm | 内置有确认授权的表单 |
externalConfirmPageUrl | 是否为外部确认授权页面 | false | 当 confirmPageUrl 托管到第三方服务中时( confirmPageUrl 所在域名和授权服务所在域名不一致),必须开启该配置 |
http 接口完整代码,请参考:jap-ids-demo (opens new window)
# 第五步:配置过滤器
jap-ids 默认提供了两类过滤器:
- Access Token 验权过滤器
- 用户登录状态过滤器
以本项目为例,配置以下两个过滤器:
# Access Token 验权过滤器
@Bean
public FilterRegistrationBean<IdsAccessTokenFilter> registeraccessTokenFilter() {
    FilterRegistrationBean<IdsAccessTokenFilter> registration = new FilterRegistrationBean<>();
    registration.setFilter(new IdsAccessTokenFilter());
    registration.addUrlPatterns("/*");
    registration.addInitParameter("ignoreUrl",
            "/," +
                    "/oauth/login," +
                    "/oauth/login/customize," +
                    "/oauth/logout," +
                    "/oauth/error," +
                    "/oauth/confirm," +
                    "/oauth/confirm/customize," +
                    "/oauth/authorize," +
                    "/oauth/authorize/auto," +
                    "/oauth/token," +
                    "/oauth/check_token," +
                    "/oauth/check_session," +
                    "/oauth/registration," +
                    "/oauth/pkce/**," +
                    "/.well-known/jwks.json," +
                    "/.well-known/openid-configuration"
    );
    registration.setName("IdsAccessTokenFilter");
    registration.setOrder(1);
    return registration;
}
1
2
3
4
5
6
7
8
9
10
11
12
13
14
15
16
17
18
19
20
21
22
23
24
25
26
27
2
3
4
5
6
7
8
9
10
11
12
13
14
15
16
17
18
19
20
21
22
23
24
25
26
27
# 用户登录状态过滤器 后期可能会被删除
@Bean
public FilterRegistrationBean<IdsUserStatusFilter> registerUserStatusFilter() {
    FilterRegistrationBean<IdsUserStatusFilter> registration = new FilterRegistrationBean<>();
    registration.setFilter(new IdsUserStatusFilter());
    registration.addUrlPatterns("/*");
    registration.addInitParameter("ignoreUrl",
            "/," +
                    "/oauth/login," +
                    "/oauth/login/customize," +
                    "/oauth/logout," +
                    "/oauth/error," +
                    "/oauth/confirm," +
                    "/oauth/confirm/customize," +
                    "/oauth/authorize," +
                    "/oauth/authorize/auto," +
                    "/oauth/token," +
                    "/oauth/check_token," +
                    "/oauth/check_session," +
                    "/oauth/registration," +
                    "/oauth/pkce/**," +
                    "/.well-known/jwks.json," +
                    "/.well-known/openid-configuration"
    );
    registration.setName("IdsUserStatusFilter");
    registration.setOrder(1);
    return registration;
}
1
2
3
4
5
6
7
8
9
10
11
12
13
14
15
16
17
18
19
20
21
22
23
24
25
26
27
2
3
4
5
6
7
8
9
10
11
12
13
14
15
16
17
18
19
20
21
22
23
24
25
26
27
# 参考页面


# 总结
基于以上步骤, 就可使用 jap-ids 快速搭建起来一套标准的 OAuth2.0 授权服务。
后续我们会提供封装好的 SDK,方便开发者一键集成。
编辑 (opens new window)
Last Updated: 2021/10/07, 18:03:43


